
Airsoft electric toy gun mk3 (iozjik)
about
Summary
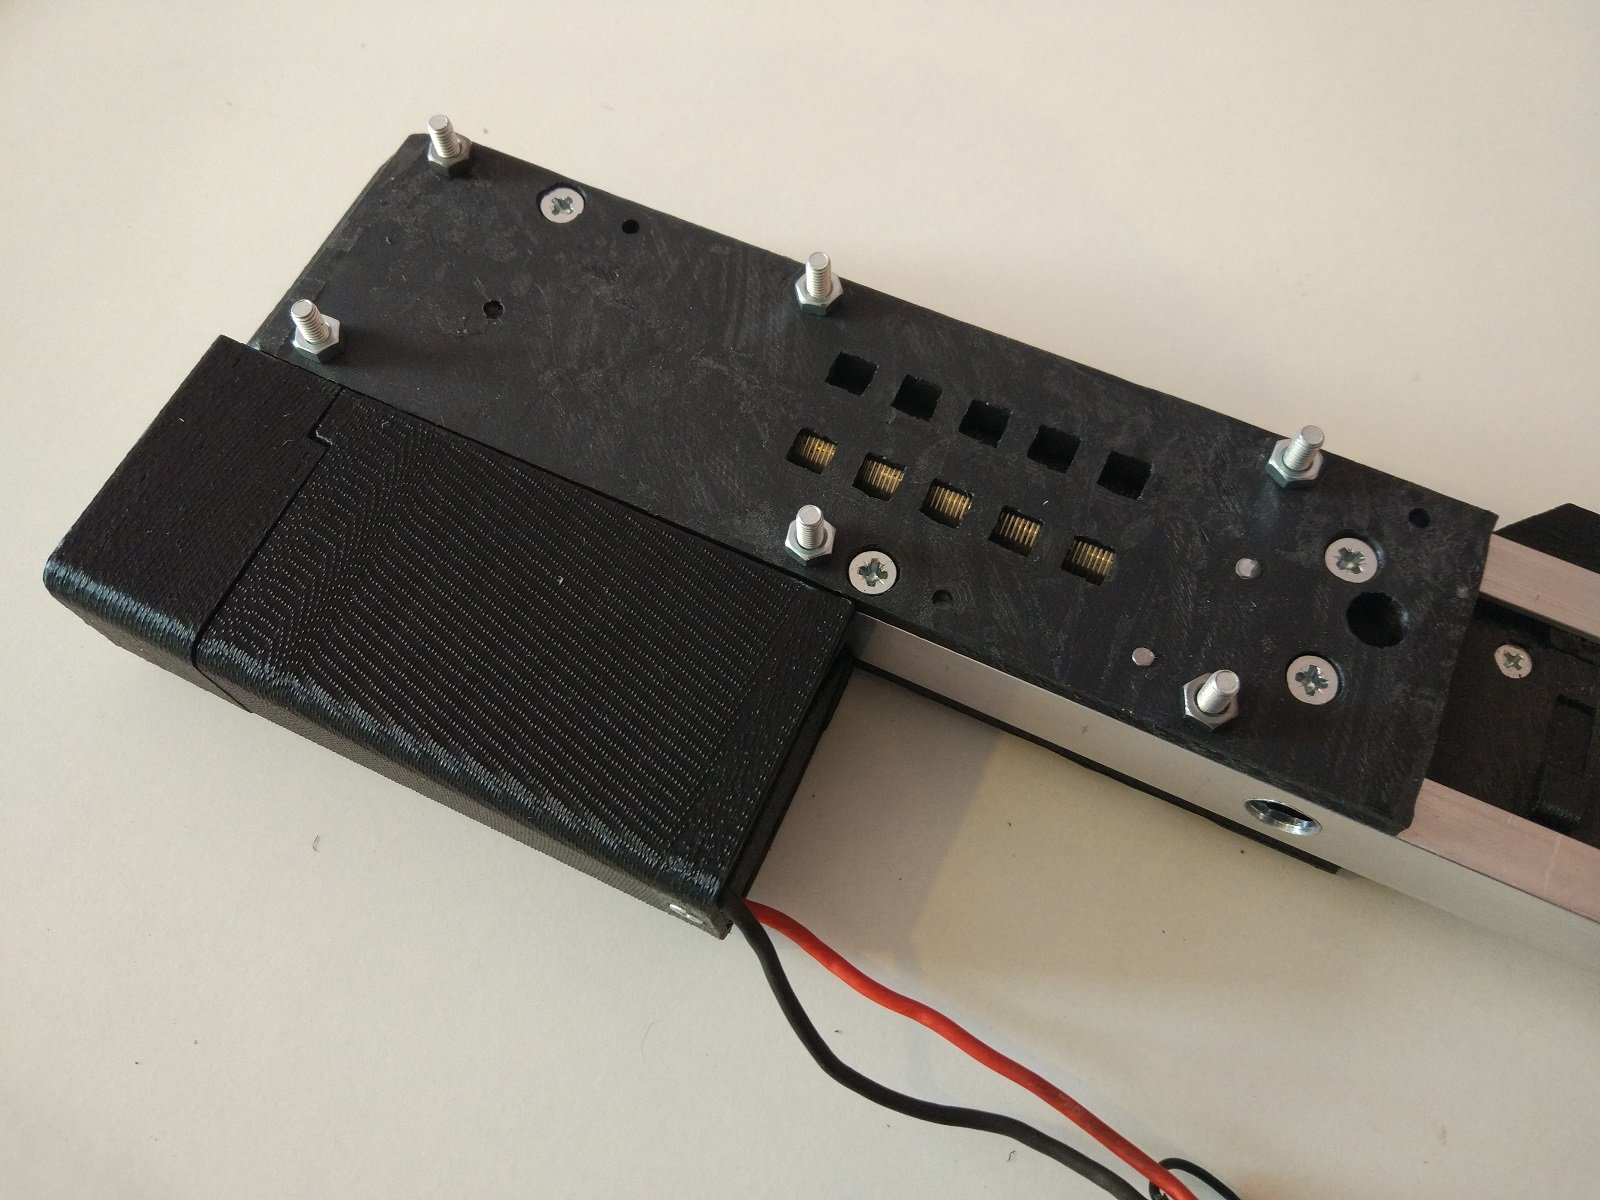
Airsoft electric gun with custom 3d printed gearbox. Uses TM-compatible parts for gearbox v3 and m-series mags. Barrel length 455 mm. For extra toughness of construction used 10x20 mm alluminium channels. Full-auto only.
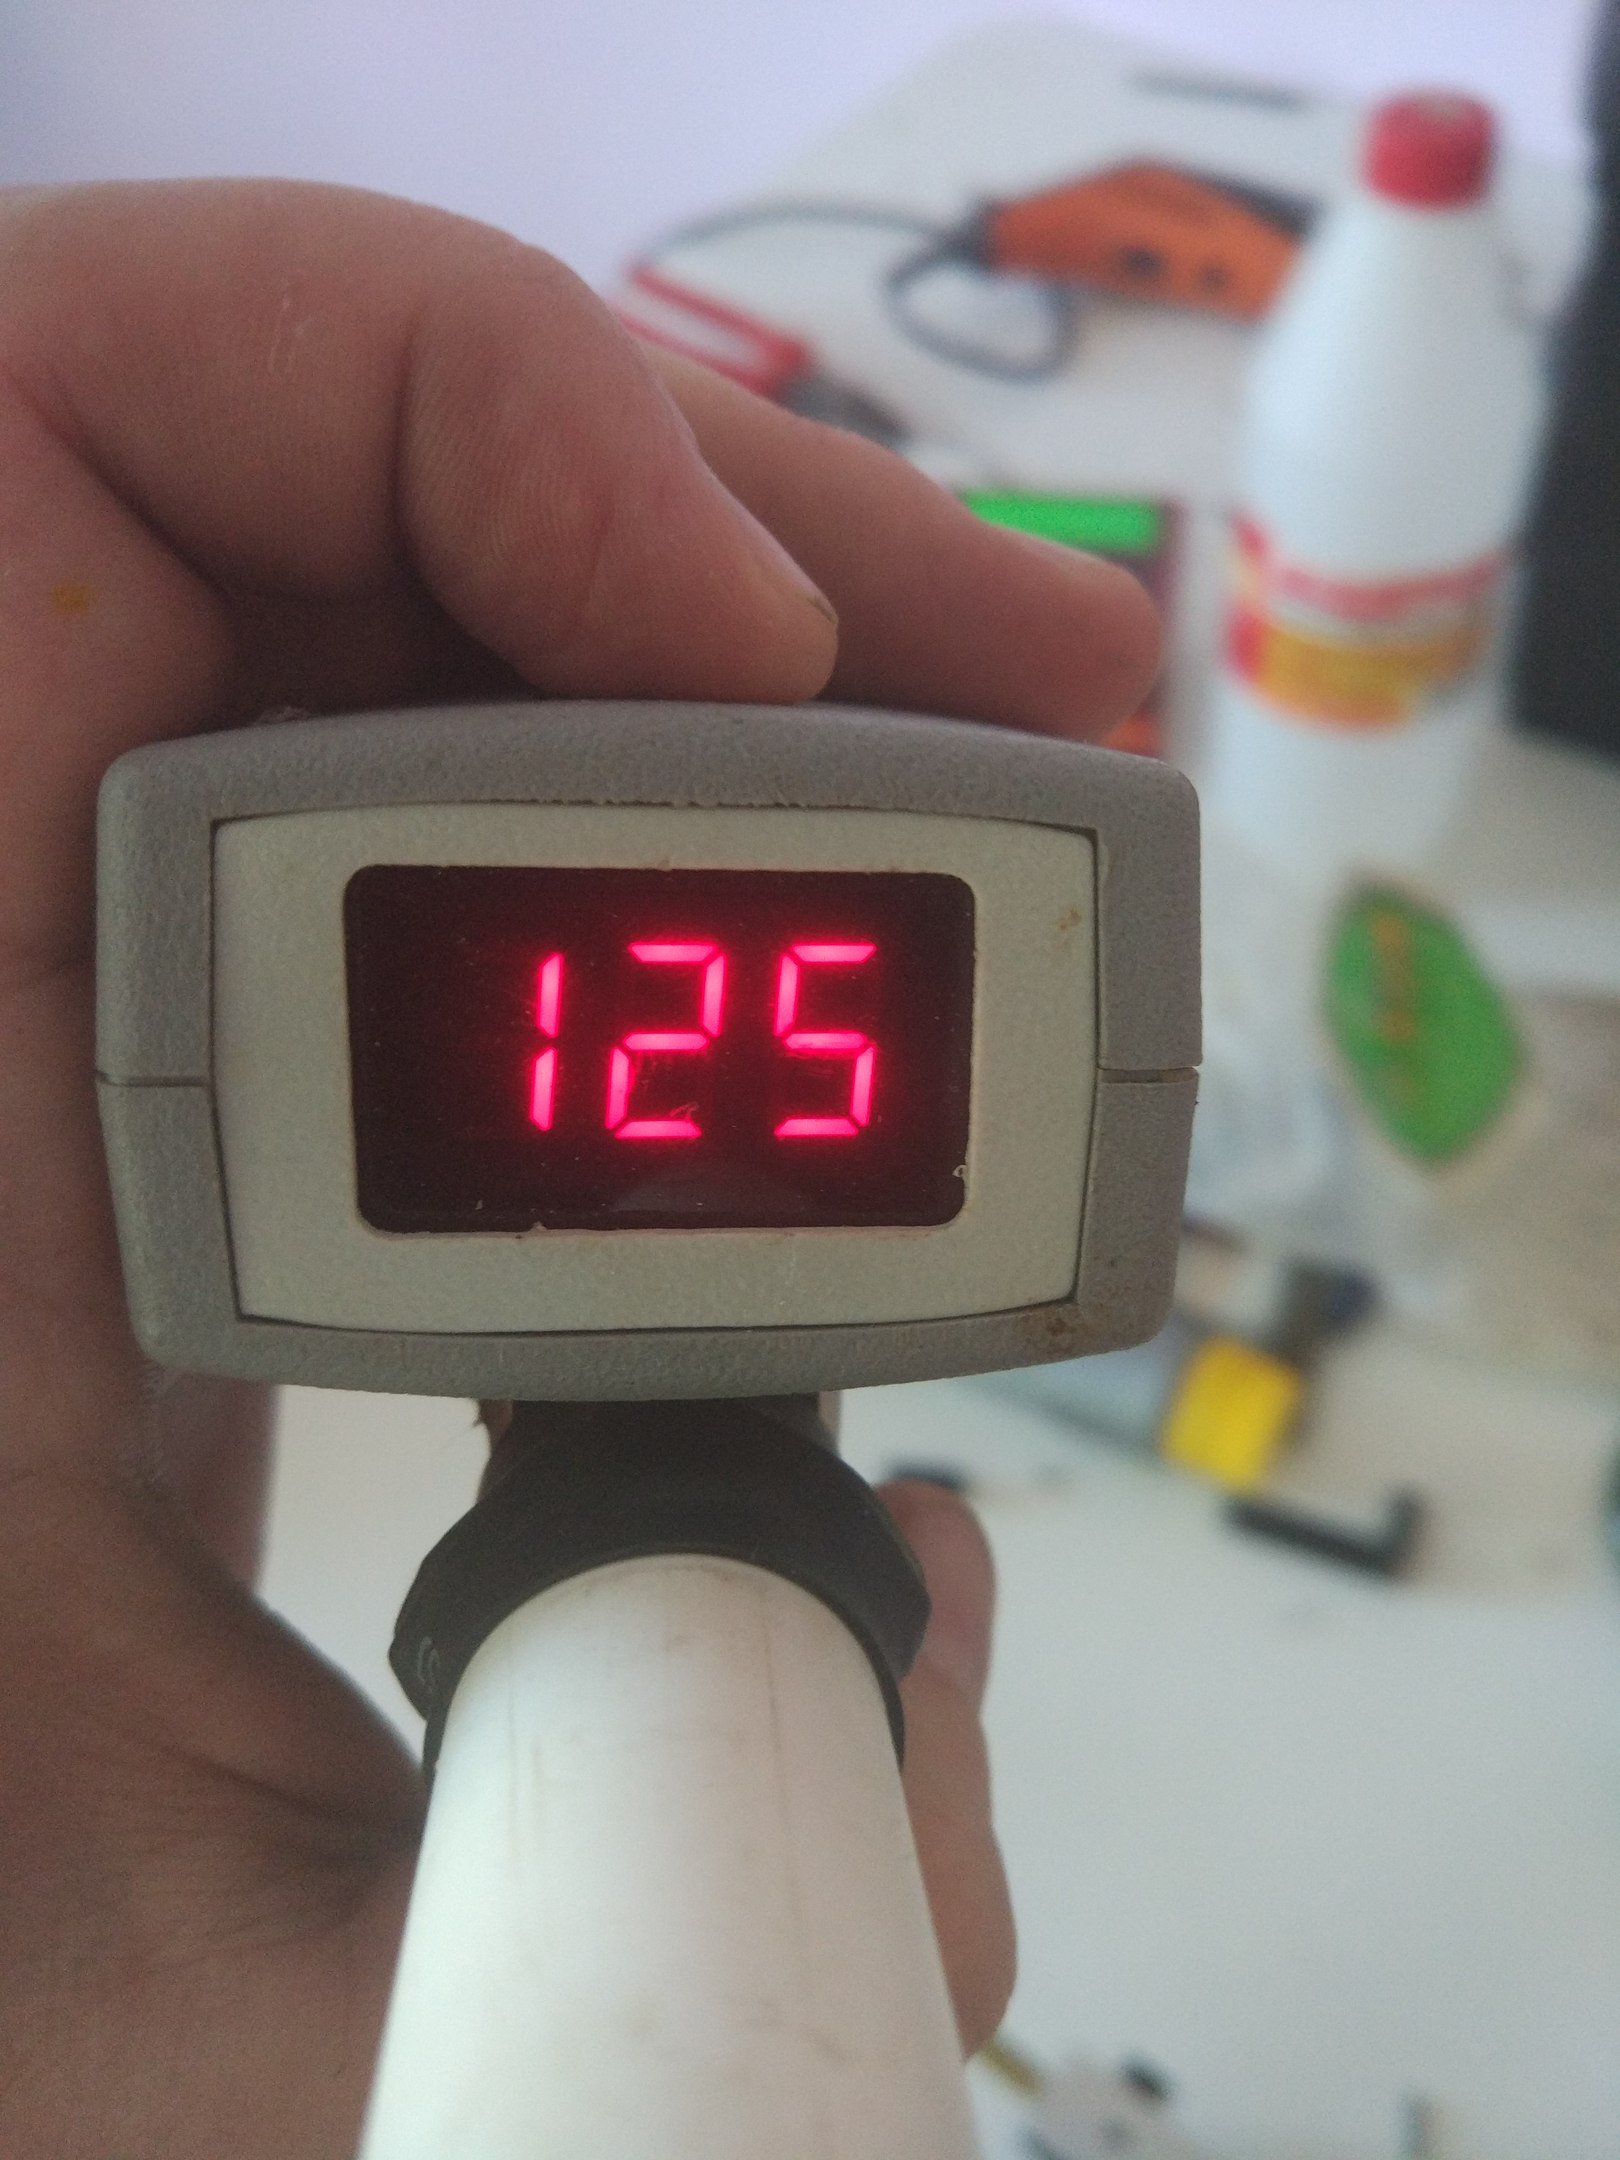
Gearbox tested with 148 m/s (487fps) output and works well.
Upd 10/06/2019: Added video of shooting:
https://www.youtube.com/watch?v=STos1IOZB0s
Added video of disassembly. AEG can be assembled in reverse order:
https://youtu.be/76tCkqQzGN8
WARNING
Project is long, plastic-consuming and require both good 3d-printing and airsoft technican skills. Use safety measures, as with any airsoft rifle. Wear protective glasses anytime while working with this project.
All parts must fit into small printer, maximum length of detail is 190mm, maximum height about 100mm (one tall detail, may be printed in parts). Top rail length is about 235mm, it may fit daigonally in 200x200 hotbed, or be cut into halves, like in perfect remix by wildshark: https://www.thingiverse.com/thing:3534980.
Project parts
Project is large and consists of many parts. This is first part of project, containing upper gearbox.
When you finish printing and assemblling all published parts, you'll have an working airsoft gun.
Lower Gearbox - https://www.thingiverse.com/thing:2916563
Hopup and channels - https://www.thingiverse.com/thing:2916686 (incomplete instructions, but usable, no blueprint for front channels)
Trigger and triggerguard - https://www.thingiverse.com/thing:3001469
Handle and magwell - https://www.thingiverse.com/thing:3103108
Rear parts of body - https://www.thingiverse.com/thing:2996664
Middle section of body - https://www.thingiverse.com/thing:3377428 (incomplete instructions, may be unreadable (or cyrillic) operation names in Solidworks files)
Frontset - https://www.thingiverse.com/thing:3387099 (incomplete instructions, may be unreadable (or cyrillic) operation names in Solidworks files)
Order of assembly
All files published, some instructions will follow. All necessary instructions on gearbox assembly published.
I'll recommend printing and assembling of gun in this order:
- Upper gearbox, lower gearbox, hop-up(sides), upper and lower channels - make an working gearbox, most difficult part of project. Make sure it works smoothly before continue. Until you assemble rear body, do not use high-power springs.
- Finish hop-up and cross parts. On this stage you may chrono your assembly for the first time. Lot of painful fine-tuning and filing.
- Print tigger, handle, magwell. Assemble, make sure mags feed and wires fit in place.
- Print rear parts of body. If your gearbox works fine, you may install tougher spring after this step. Rear parts of body make gearbox stronger.
- Make left and right channels. than print middle body and finish with frontset.
- Enjoy =)
Upper gearbox assembly
Requirements
Warning - before print, make sure your printer is calibrated good. Sides of gearbox must be exactly 179mm long. If you have to scale details to make them appropriate sized, scale all other details of this project too.
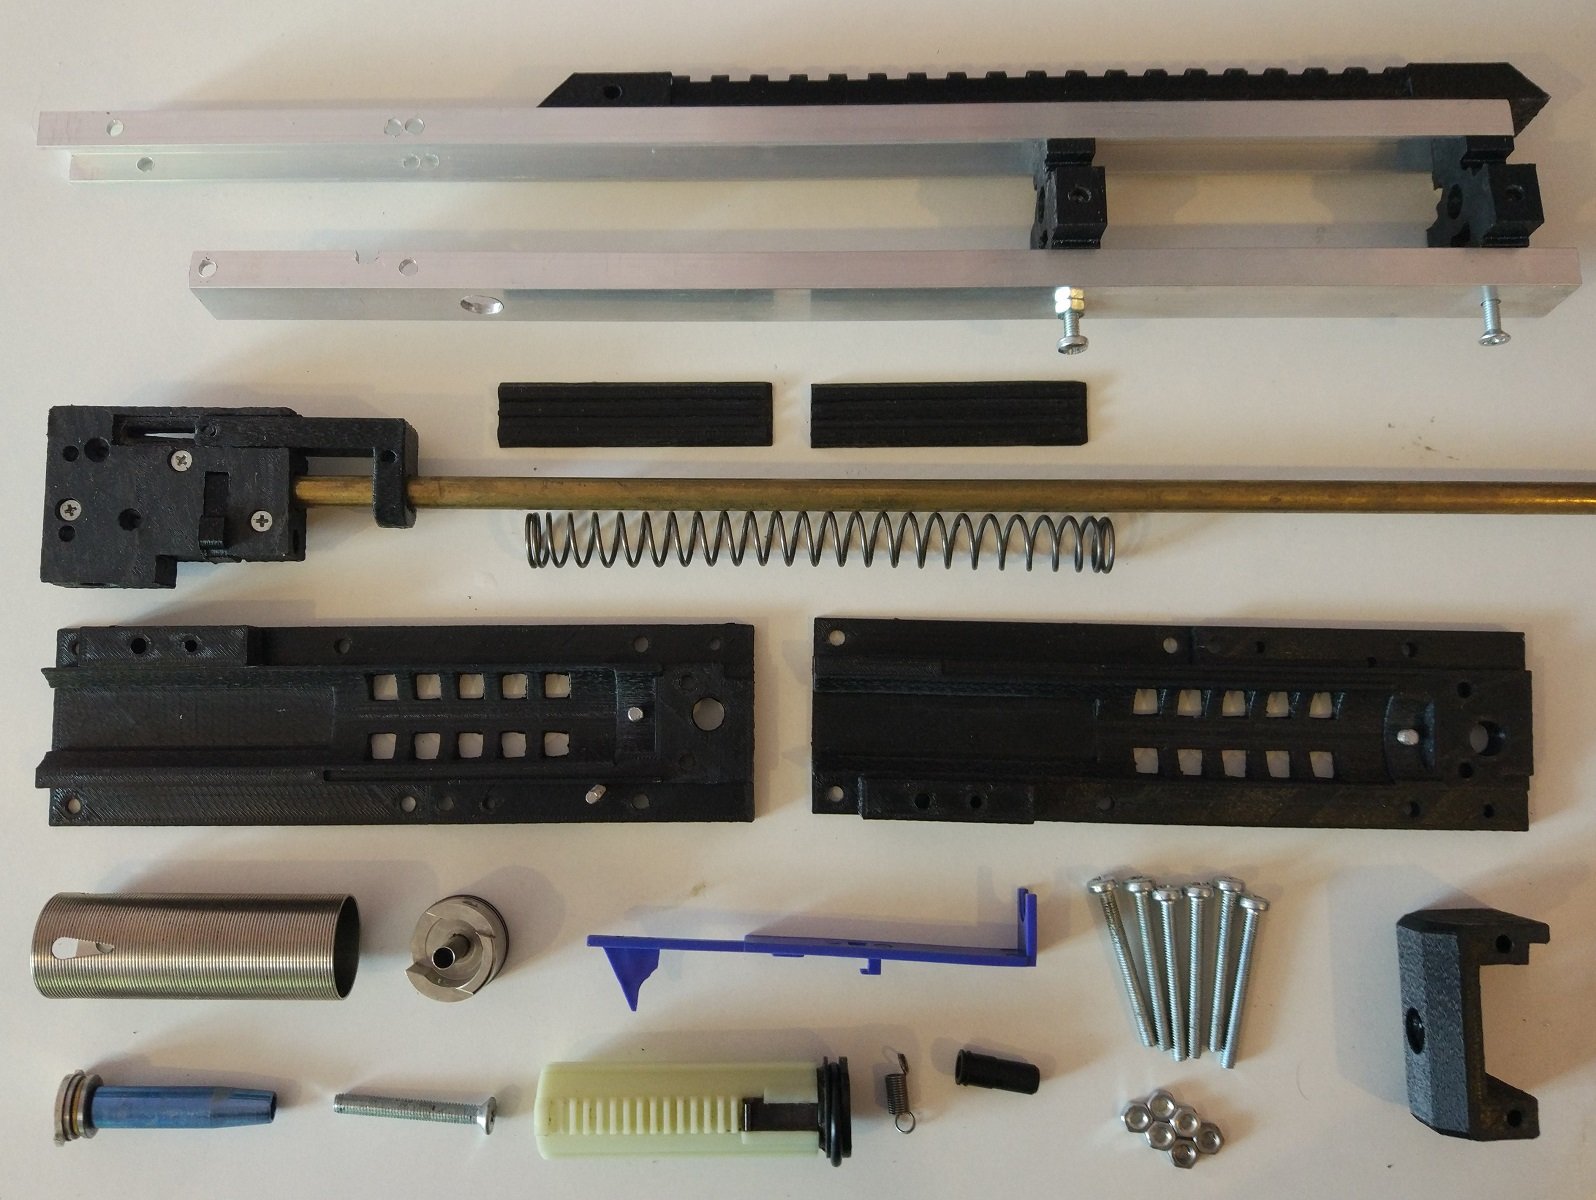
Parts:
Printed:
- Left and right sides of upper gearbox (layer 0.2, infill 40%), lay on flat side,no supports.
- Piston guides (gearbox_insert) (layer 0.2, infill 40%), lay on flat side,no supports, print 2 for left and right side.
- Back part (gearbox_insert) (layer 0.2, infill 40%), spring guide hole must point sideways,no supports.
TM-compatible:
- cylinder
- cylinder head
- ak-type nozzle
- v3 tappet plate
- piston
- piston head
- tappet spring
- spring guide (with m5 thread inside)
- spring (better not more than m100 for assembly and fine tuning)
Other parts:
- M4 nuts - 10
- M4 sunk head screw, 30mm - 4
- M4 flat head screw, 40mm or more - 6
- Pieces of M4 screw without head, 10 mm (cylinder head retainer) - 2
- Piece of M3 screw without head, 28-30mm (tappet spring retainer) - 1
- M5 sunk head screw, 20mm or longer -1
Assembled hopup + alluminium channels.
Assembled lower gearbox.
Step 1
Take all parts, remove extra plastic traces, dril all holes to be exactly 3 and 4 mm, except holes for cylinder head retaining screws, and hole in left part of gearbox for tappet spring retaining screw.
Holes for m4 nuts intentionally left blind to ensure good printing without support. Drill them through.
Install piston guides into left and right side of gearbox. File them a bit - they must sit firmly in places, but be extractable without exeptional force.
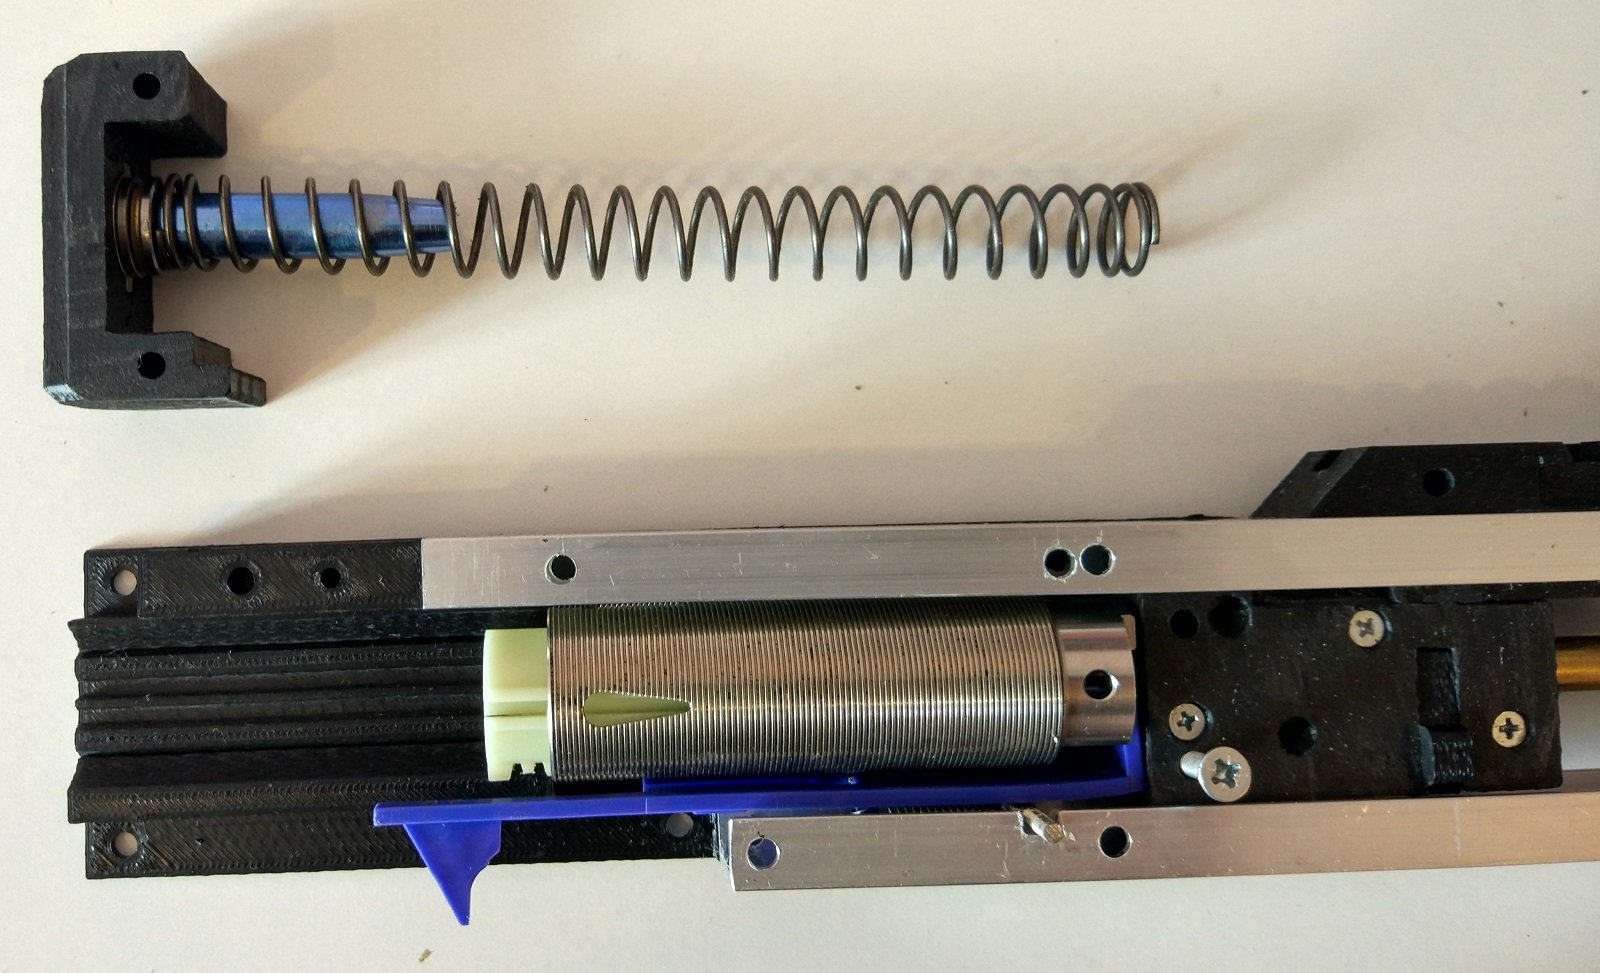
Take left part of gearbox, install M4 nuts, cylinder head retainet and tappet spring retainer. Install cylinder, cylinder head, tappet, tappet spring, nozzle and assembled piston.

Step 2
Add hop-up and alluminium channels assembly.
Attach spring guide to rear side of gearbox by m5 screw.
Step 3
Install right part of gearbox and secure in with 4 m4 30mm screws. Make sure hop up is in the right plase and secured by 2 m4 screws.
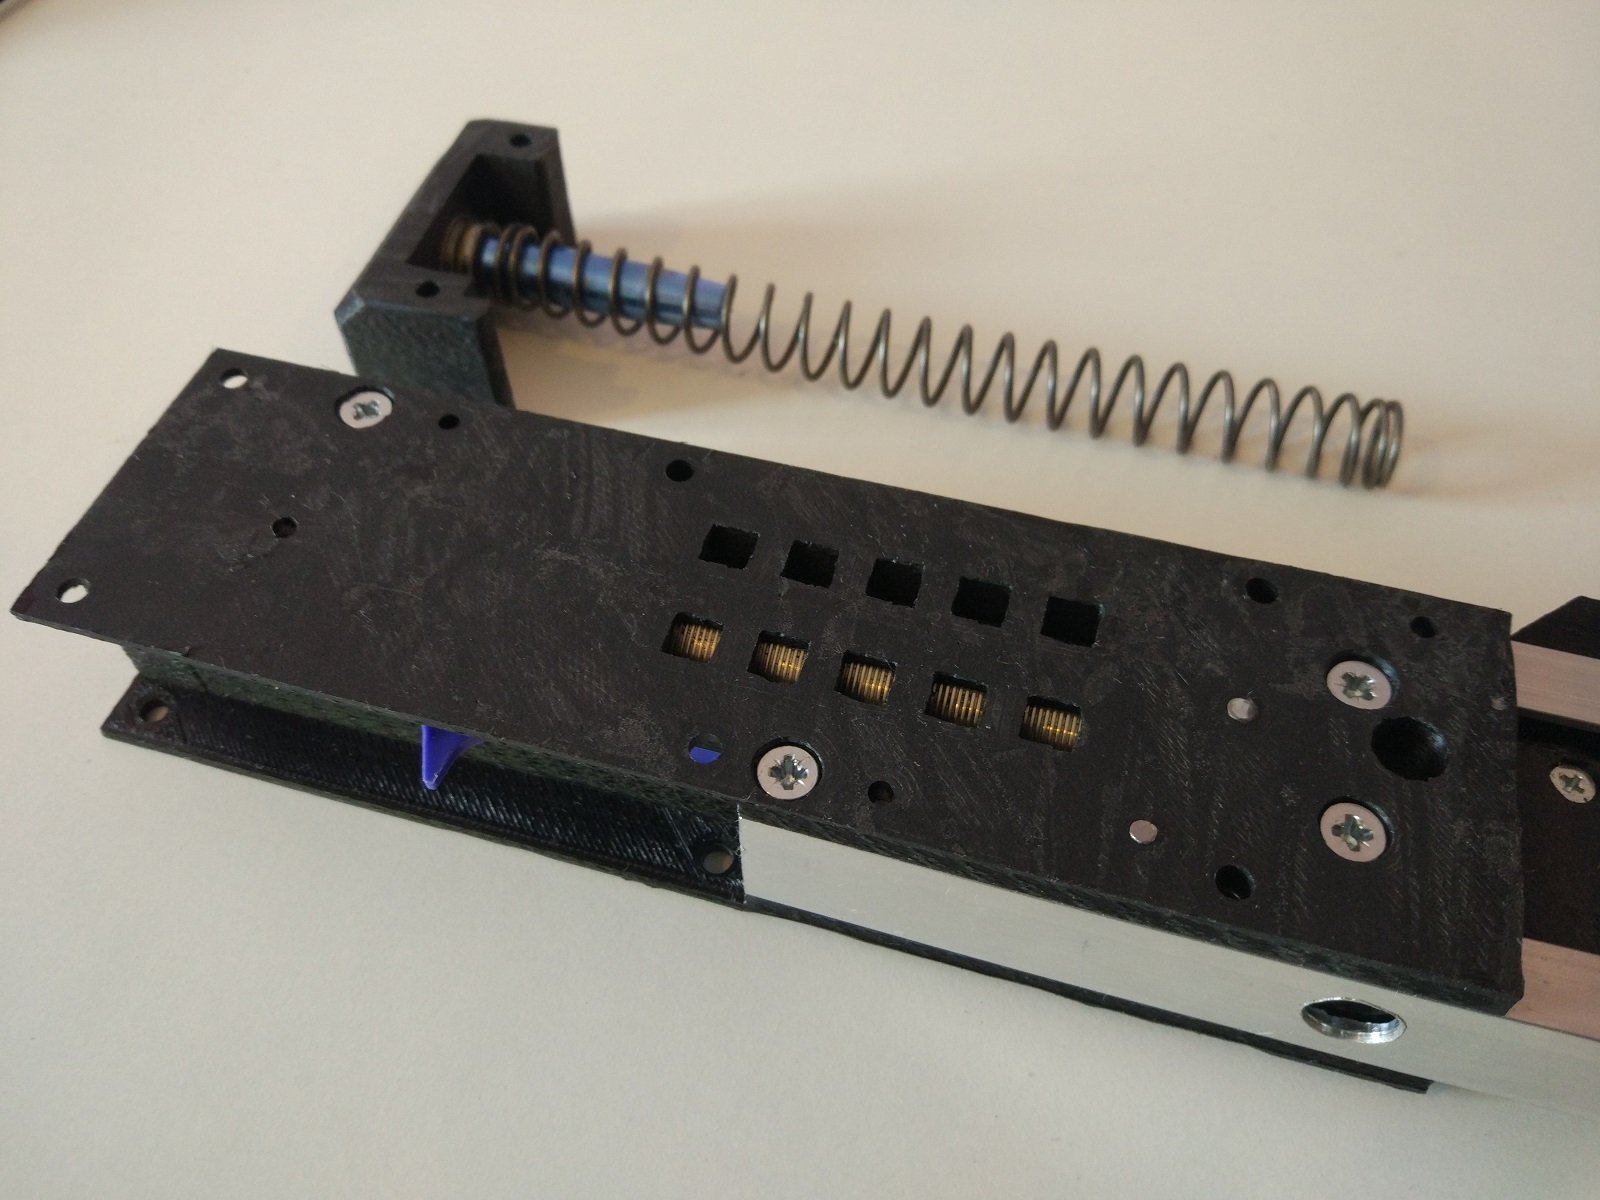
Step 4
Install assembled lower gearbox. Make sure that sector gear teeth is not wisible (they must point down inside lower gearbox) and tappet tail interacts with sector gear properly.Secure front side of box with m4 screw.
Install 3 m4 screws, which will fix alluminium channels.
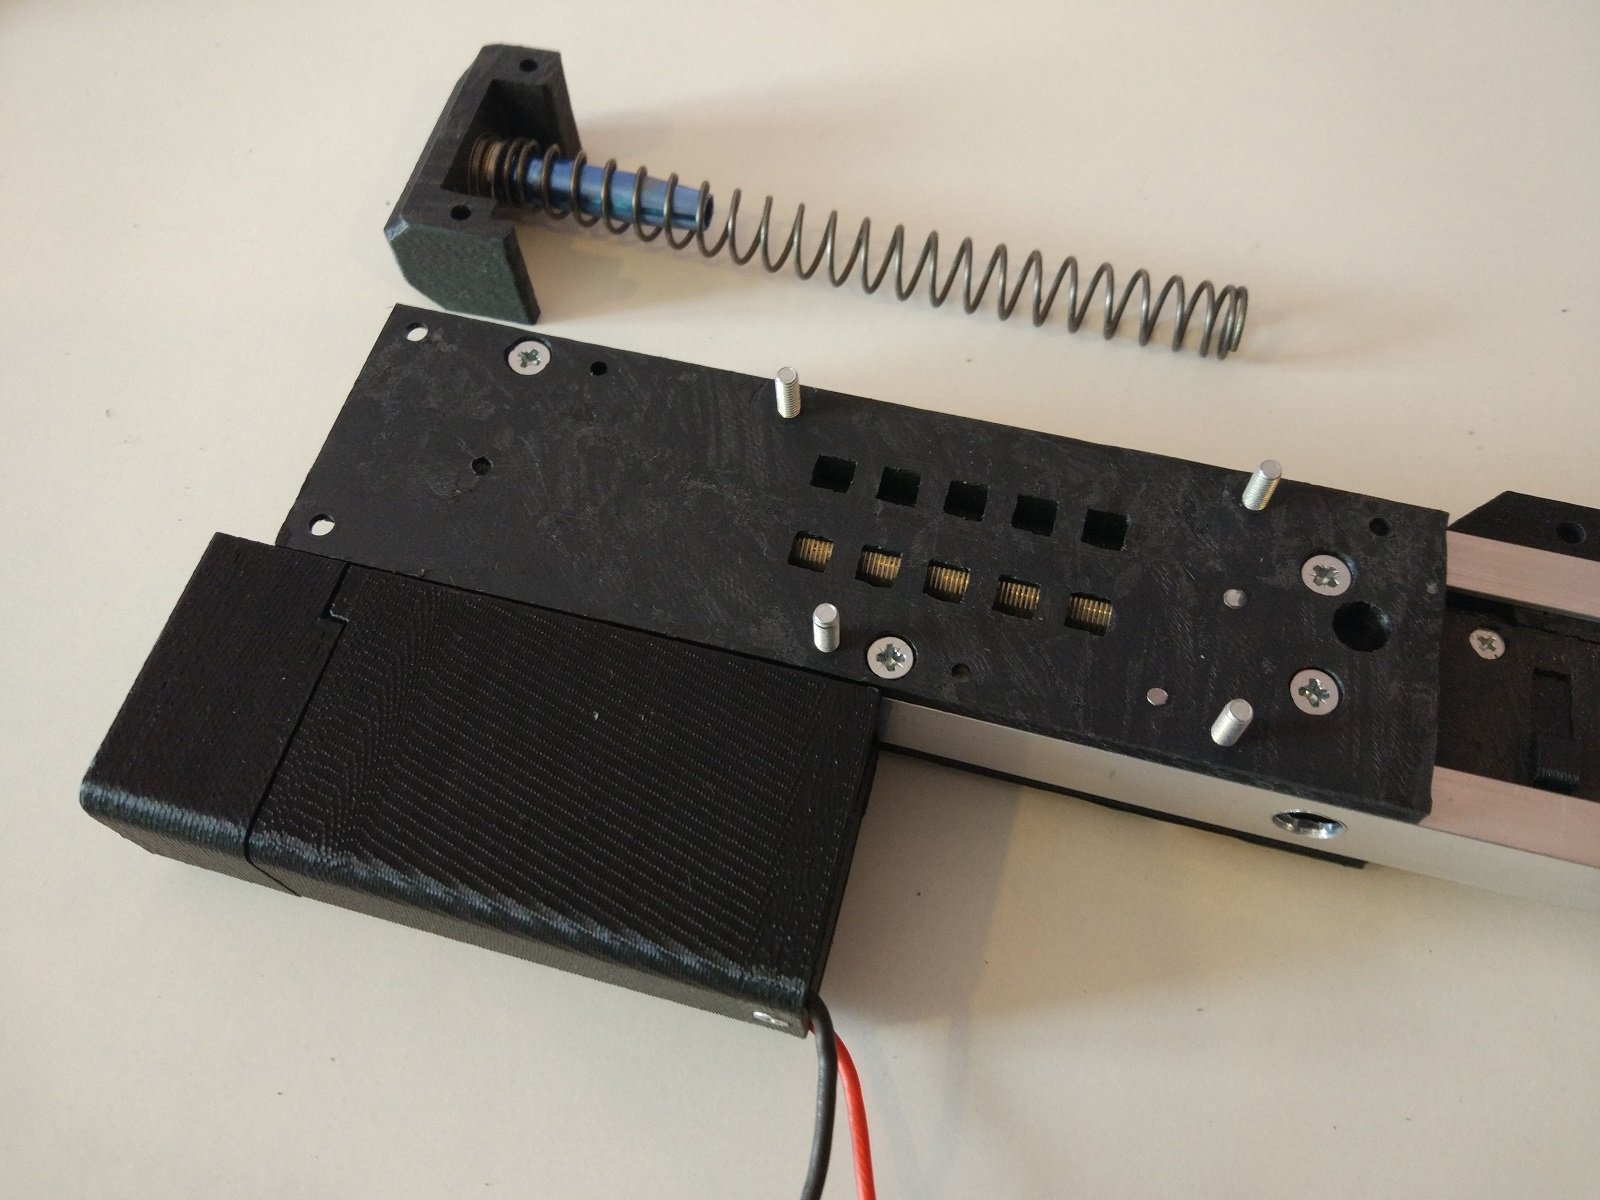
Step 5
Install back plate of upper gearbox. Make sure it holds lower box and spring points inwards piston. Secure back plate by 2 m4 screws and place nuts an all of the screws.
Test
Screws pointing out of gearbox may look not great - but it is the easiest way to test box. When you'll start assembling rear external parts of AEG, screws will be replaced to hidden ones.
Test gearbox by shooting, make sure sound is right and speed of bb is good (fedd bb manually for now for chrono purposes)
FAQ
FAQ will be updated sometimes ;)
-
Why "mk3"?
I've tried a lot of different AEG designs, so this may be called mk10 or mk20, but i like mk3 for now. Worked a lot on mk2 version before, but redesigned it into mk3 after huge changes in conceptions =) -
How much plastics this project will consume?
About 1 kg if you do all well. I've spent about 8 kg on different versions and failed prints. -
What instruments will be required?
I've designed alluminium channels to be easily made, so they not require machining. Only electrical instrument required is electric drill. You'll also need lot of files, sanding paper, handsaw, screwdrivers, pliers and lots of patience =) -
Materials and printer requirements
I use ABS for this project. Maybe other sturdy plastics will be ok too. If you print gearbox parts of other plastics and it works - let me know, i'll add this info here.
I've designed parts of project to fit 200*200 mm printer table. Maximum length of single detail is about 190mm, except for top rail, which is 230+mm, but may be placed at hotbed diagonally. - FPS
Well,no springs for me - again. I've got maybe 200 of spare springs, but know nominals ony for 3 of them =( So only small tests for now. I perform tests with 0.28 gramm bb and use calculator to estimate values with 0.20 bb.
Performance: about 1500 dry shots, about 1500 normal shots:
With m100 spring - 87 m/s (286 fps) with 0.28 bb. It would be 1.06 joules or 103 m/s (338 fps) with 0.20 bb.
Stress test: in progress, about 150 shots, mostly dry ones. Gearbox still do it's job and not falling apart 8)
With m140 spring - 125 m/s (412 fps) with 0.28bb. It would be 2.2 joules or 148m/s (487 fps) with 0.20 bb.
I'm going to update progress sometimes =)
Distance, accuracy
Tested shooting distance with m100 spring and 0.28 balls. Hopup works well, balls fly 50 meters and still able to hit target sometimes. Tested on sports shooting ground, so 50 meters is pretty accurately measured. Target was me, so I'm absolutely sure balls may hit target ;)
Accuracy poor for now, tested gun without frontset. About 1 of 20 balls may hit standing human at 50 meters. Totally assembled gun must perform better.
Ball feeding is perfect, about 600 shots without dry ones - until mags are empty.
Update 10/06/2019: I've replaced hop-up rubber (used violet prometheus) and get much better accuracy on assebled AEG. Please, be patient, when you choose and install hop-up rubber - it's crucial to ensure good performance for airsoft gun.
Update 21/06/2019 Replaced full-sized cylinder to one with cut out. Improved accuracy. Seems it's now close in accuracy to a stock AEG.
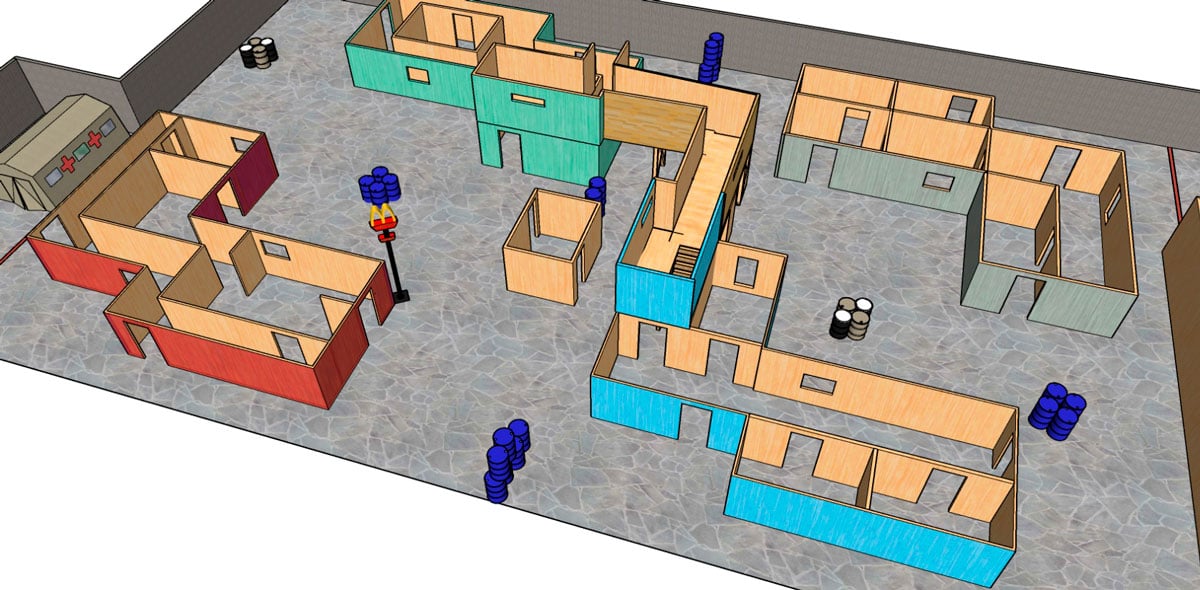
Tested AEG at local CQB arena and really like results - gun is easy to use, ergonomical and allows fast transition from right to left shoulder.
Update 27.08.2019
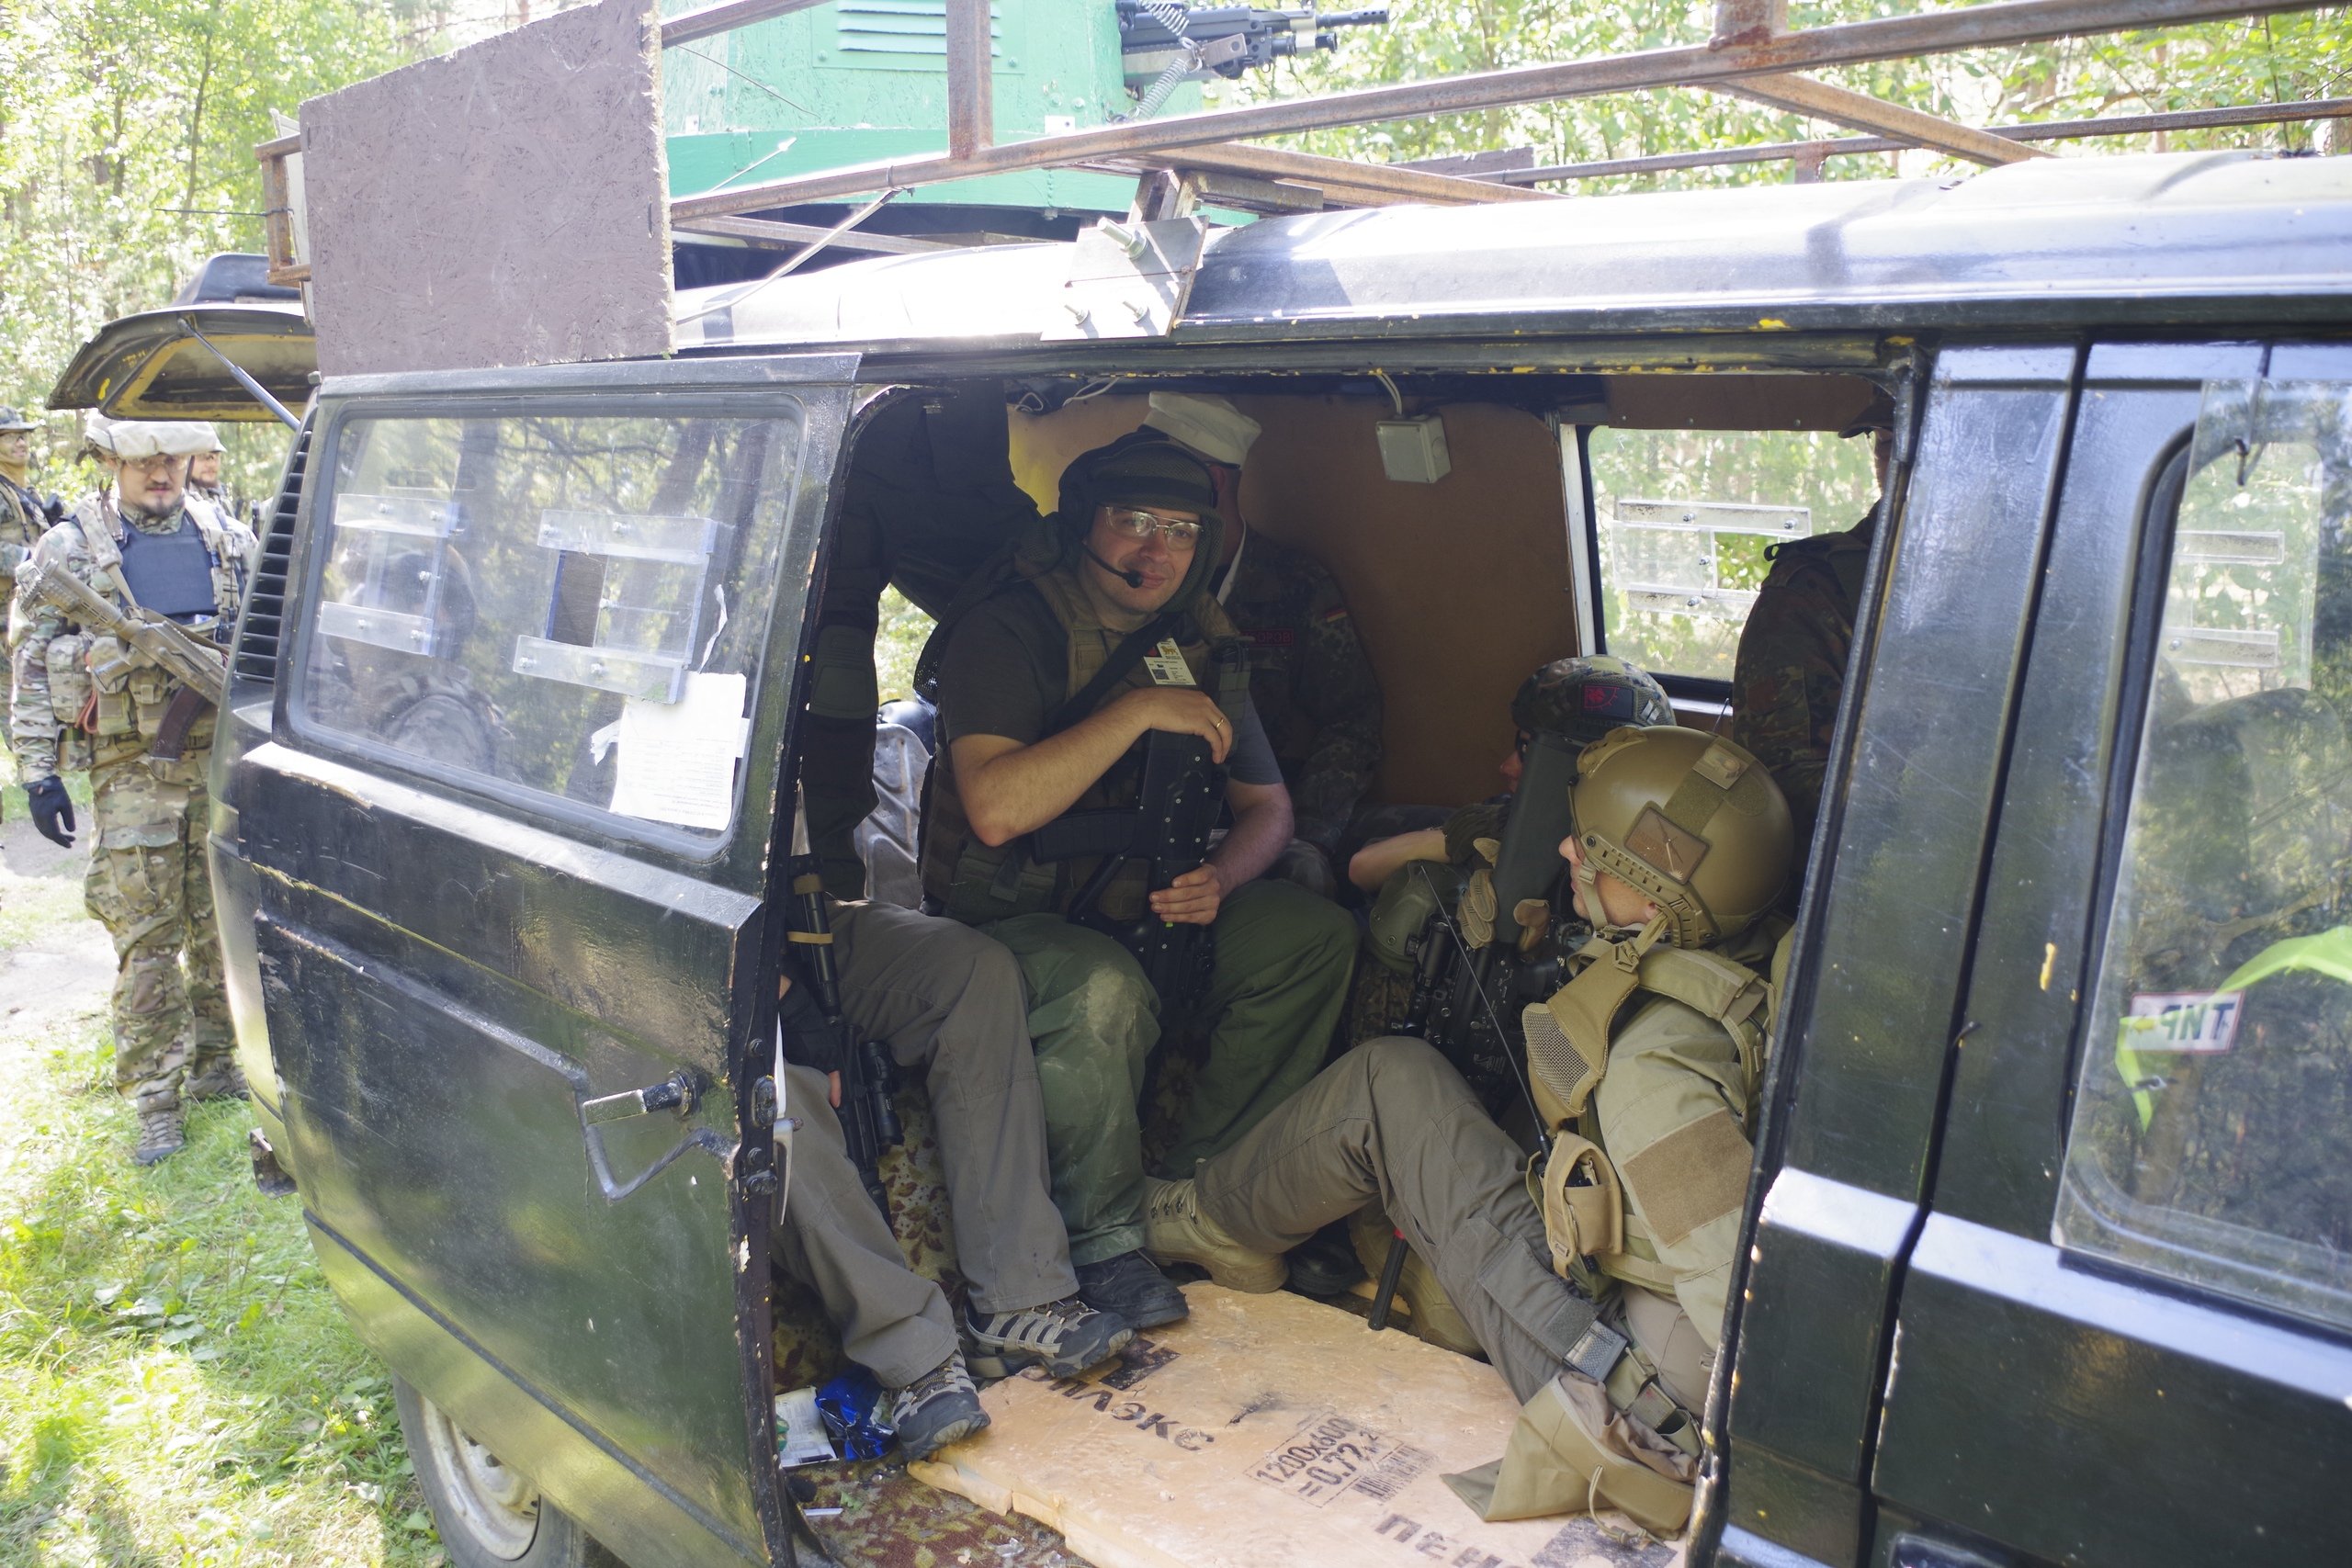
I've visited milsim event "Burning zone" this weekend. It lasted for 24 hours of non-stop action, so I've tried AEG ergonomics in lots of different circumstances. Vehicle operations, deep forest at night, covert operations and large-scale combat (about 200 of participants). AEG performed well and without any malfunctions. Maybe pistol grip needs a bit redesign, but it is a modular part and do not need too much editing. Anyway, not every airsoft player spends 6+ hours holding his AEG in hand.
Total shot count already more than 10000, at least 4000 in different in-game situations.

files
| File | Extension |
|---|---|
| Airsoft electric toy gun mk3 - 2916390.zip | zip |
versions
Version: 1.0.0 latest
Summary
Airsoft electric gun with custom 3d printed gearbox. Uses TM-compatible parts for gearbox v3 and m-series mags. Barrel length 455 mm. For extra toughness of construction used 10x20 mm alluminium channels. Full-auto only.
Gearbox tested with 148 m/s (487fps) output and works well.
Upd 10/06/2019: Added video of shooting:
https://www.youtube.com/watch?v=STos1IOZB0s
Added video of disassembly. AEG can be assembled in reverse order:
https://youtu.be/76tCkqQzGN8
WARNING
Project is long, plastic-consuming and require both good 3d-printing and airsoft technican skills. Use safety measures, as with any airsoft rifle. Wear protective glasses anytime while working with this project.
All parts must fit into small printer, maximum length of detail is 190mm, maximum height about 100mm (one tall detail, may be printed in parts). Top rail length is about 235mm, it may fit daigonally in 200x200 hotbed, or be cut into halves, like in perfect remix by wildshark: https://www.thingiverse.com/thing:3534980.
Project parts
Project is large and consists of many parts. This is first part of project, containing upper gearbox.
When you finish printing and assemblling all published parts, you'll have an working airsoft gun.
Lower Gearbox - https://www.thingiverse.com/thing:2916563
Hopup and channels - https://www.thingiverse.com/thing:2916686 (incomplete instructions, but usable, no blueprint for front channels)
Trigger and triggerguard - https://www.thingiverse.com/thing:3001469
Handle and magwell - https://www.thingiverse.com/thing:3103108
Rear parts of body - https://www.thingiverse.com/thing:2996664
Middle section of body - https://www.thingiverse.com/thing:3377428 (incomplete instructions, may be unreadable (or cyrillic) operation names in Solidworks files)
Frontset - https://www.thingiverse.com/thing:3387099 (incomplete instructions, may be unreadable (or cyrillic) operation names in Solidworks files)
Order of assembly
All files published, some instructions will follow. All necessary instructions on gearbox assembly published.
I'll recommend printing and assembling of gun in this order:
- Upper gearbox, lower gearbox, hop-up(sides), upper and lower channels - make an working gearbox, most difficult part of project. Make sure it works smoothly before continue. Until you assemble rear body, do not use high-power springs.
- Finish hop-up and cross parts. On this stage you may chrono your assembly for the first time. Lot of painful fine-tuning and filing.
- Print tigger, handle, magwell. Assemble, make sure mags feed and wires fit in place.
- Print rear parts of body. If your gearbox works fine, you may install tougher spring after this step. Rear parts of body make gearbox stronger.
- Make left and right channels. than print middle body and finish with frontset.
- Enjoy =)
Upper gearbox assembly
Requirements
Warning - before print, make sure your printer is calibrated good. Sides of gearbox must be exactly 179mm long. If you have to scale details to make them appropriate sized, scale all other details of this project too.
Parts:
Printed:
- Left and right sides of upper gearbox (layer 0.2, infill 40%), lay on flat side,no supports.
- Piston guides (gearbox_insert) (layer 0.2, infill 40%), lay on flat side,no supports, print 2 for left and right side.
- Back part (gearbox_insert) (layer 0.2, infill 40%), spring guide hole must point sideways,no supports.
TM-compatible:
- cylinder
- cylinder head
- ak-type nozzle
- v3 tappet plate
- piston
- piston head
- tappet spring
- spring guide (with m5 thread inside)
- spring (better not more than m100 for assembly and fine tuning)
Other parts:
- M4 nuts - 10
- M4 sunk head screw, 30mm - 4
- M4 flat head screw, 40mm or more - 6
- Pieces of M4 screw without head, 10 mm (cylinder head retainer) - 2
- Piece of M3 screw without head, 28-30mm (tappet spring retainer) - 1
- M5 sunk head screw, 20mm or longer -1
Assembled hopup + alluminium channels.
Assembled lower gearbox.
Step 1
Take all parts, remove extra plastic traces, dril all holes to be exactly 3 and 4 mm, except holes for cylinder head retaining screws, and hole in left part of gearbox for tappet spring retaining screw.
Holes for m4 nuts intentionally left blind to ensure good printing without support. Drill them through.
Install piston guides into left and right side of gearbox. File them a bit - they must sit firmly in places, but be extractable without exeptional force.
Take left part of gearbox, install M4 nuts, cylinder head retainet and tappet spring retainer. Install cylinder, cylinder head, tappet, tappet spring, nozzle and assembled piston.
Step 2
Add hop-up and alluminium channels assembly.
Attach spring guide to rear side of gearbox by m5 screw.
Step 3
Install right part of gearbox and secure in with 4 m4 30mm screws. Make sure hop up is in the right plase and secured by 2 m4 screws.
Step 4
Install assembled lower gearbox. Make sure that sector gear teeth is not wisible (they must point down inside lower gearbox) and tappet tail interacts with sector gear properly.Secure front side of box with m4 screw.
Install 3 m4 screws, which will fix alluminium channels.
Step 5
Install back plate of upper gearbox. Make sure it holds lower box and spring points inwards piston. Secure back plate by 2 m4 screws and place nuts an all of the screws.
Test
Screws pointing out of gearbox may look not great - but it is the easiest way to test box. When you'll start assembling rear external parts of AEG, screws will be replaced to hidden ones.
Test gearbox by shooting, make sure sound is right and speed of bb is good (fedd bb manually for now for chrono purposes)
FAQ
FAQ will be updated sometimes ;)
-
Why "mk3"?
I've tried a lot of different AEG designs, so this may be called mk10 or mk20, but i like mk3 for now. Worked a lot on mk2 version before, but redesigned it into mk3 after huge changes in conceptions =) -
How much plastics this project will consume?
About 1 kg if you do all well. I've spent about 8 kg on different versions and failed prints. -
What instruments will be required?
I've designed alluminium channels to be easily made, so they not require machining. Only electrical instrument required is electric drill. You'll also need lot of files, sanding paper, handsaw, screwdrivers, pliers and lots of patience =) -
Materials and printer requirements
I use ABS for this project. Maybe other sturdy plastics will be ok too. If you print gearbox parts of other plastics and it works - let me know, i'll add this info here.
I've designed parts of project to fit 200*200 mm printer table. Maximum length of single detail is about 190mm, except for top rail, which is 230+mm, but may be placed at hotbed diagonally. - FPS
Well,no springs for me - again. I've got maybe 200 of spare springs, but know nominals ony for 3 of them =( So only small tests for now. I perform tests with 0.28 gramm bb and use calculator to estimate values with 0.20 bb.
Performance: about 1500 dry shots, about 1500 normal shots:
With m100 spring - 87 m/s (286 fps) with 0.28 bb. It would be 1.06 joules or 103 m/s (338 fps) with 0.20 bb.
Stress test: in progress, about 150 shots, mostly dry ones. Gearbox still do it's job and not falling apart 8)
With m140 spring - 125 m/s (412 fps) with 0.28bb. It would be 2.2 joules or 148m/s (487 fps) with 0.20 bb.
I'm going to update progress sometimes =)
Distance, accuracy
Tested shooting distance with m100 spring and 0.28 balls. Hopup works well, balls fly 50 meters and still able to hit target sometimes. Tested on sports shooting ground, so 50 meters is pretty accurately measured. Target was me, so I'm absolutely sure balls may hit target ;)
Accuracy poor for now, tested gun without frontset. About 1 of 20 balls may hit standing human at 50 meters. Totally assembled gun must perform better.
Ball feeding is perfect, about 600 shots without dry ones - until mags are empty.
Update 10/06/2019: I've replaced hop-up rubber (used violet prometheus) and get much better accuracy on assebled AEG. Please, be patient, when you choose and install hop-up rubber - it's crucial to ensure good performance for airsoft gun.
Update 21/06/2019 Replaced full-sized cylinder to one with cut out. Improved accuracy. Seems it's now close in accuracy to a stock AEG.
Tested AEG at local CQB arena and really like results - gun is easy to use, ergonomical and allows fast transition from right to left shoulder.
Update 27.08.2019
I've visited milsim event "Burning zone" this weekend. It lasted for 24 hours of non-stop action, so I've tried AEG ergonomics in lots of different circumstances. Vehicle operations, deep forest at night, covert operations and large-scale combat (about 200 of participants). AEG performed well and without any malfunctions. Maybe pistol grip needs a bit redesign, but it is a modular part and do not need too much editing. Anyway, not every airsoft player spends 6+ hours holding his AEG in hand.
Total shot count already more than 10000, at least 4000 in different in-game situations.
about
Summary
Airsoft electric gun with custom 3d printed gearbox. Uses TM-compatible parts for gearbox v3 and m-series mags. Barrel length 455 mm. For extra toughness of construction used 10x20 mm alluminium channels. Full-auto only.
Gearbox tested with 148 m/s (487fps) output and works well.
Upd 10/06/2019: Added video of shooting:
https://www.youtube.com/watch?v=STos1IOZB0s
Added video of disassembly. AEG can be assembled in reverse order:
https://youtu.be/76tCkqQzGN8
WARNING
Project is long, plastic-consuming and require both good 3d-printing and airsoft technican skills. Use safety measures, as with any airsoft rifle. Wear protective glasses anytime while working with this project.
All parts must fit into small printer, maximum length of detail is 190mm, maximum height about 100mm (one tall detail, may be printed in parts). Top rail length is about 235mm, it may fit daigonally in 200x200 hotbed, or be cut into halves, like in perfect remix by wildshark: https://www.thingiverse.com/thing:3534980.
Project parts
Project is large and consists of many parts. This is first part of project, containing upper gearbox.
When you finish printing and assemblling all published parts, you'll have an working airsoft gun.
Lower Gearbox - https://www.thingiverse.com/thing:2916563
Hopup and channels - https://www.thingiverse.com/thing:2916686 (incomplete instructions, but usable, no blueprint for front channels)
Trigger and triggerguard - https://www.thingiverse.com/thing:3001469
Handle and magwell - https://www.thingiverse.com/thing:3103108
Rear parts of body - https://www.thingiverse.com/thing:2996664
Middle section of body - https://www.thingiverse.com/thing:3377428 (incomplete instructions, may be unreadable (or cyrillic) operation names in Solidworks files)
Frontset - https://www.thingiverse.com/thing:3387099 (incomplete instructions, may be unreadable (or cyrillic) operation names in Solidworks files)
Order of assembly
All files published, some instructions will follow. All necessary instructions on gearbox assembly published.
I'll recommend printing and assembling of gun in this order:
- Upper gearbox, lower gearbox, hop-up(sides), upper and lower channels - make an working gearbox, most difficult part of project. Make sure it works smoothly before continue. Until you assemble rear body, do not use high-power springs.
- Finish hop-up and cross parts. On this stage you may chrono your assembly for the first time. Lot of painful fine-tuning and filing.
- Print tigger, handle, magwell. Assemble, make sure mags feed and wires fit in place.
- Print rear parts of body. If your gearbox works fine, you may install tougher spring after this step. Rear parts of body make gearbox stronger.
- Make left and right channels. than print middle body and finish with frontset.
- Enjoy =)
Upper gearbox assembly
Requirements
Warning - before print, make sure your printer is calibrated good. Sides of gearbox must be exactly 179mm long. If you have to scale details to make them appropriate sized, scale all other details of this project too.
Parts:
Printed:
- Left and right sides of upper gearbox (layer 0.2, infill 40%), lay on flat side,no supports.
- Piston guides (gearbox_insert) (layer 0.2, infill 40%), lay on flat side,no supports, print 2 for left and right side.
- Back part (gearbox_insert) (layer 0.2, infill 40%), spring guide hole must point sideways,no supports.
TM-compatible:
- cylinder
- cylinder head
- ak-type nozzle
- v3 tappet plate
- piston
- piston head
- tappet spring
- spring guide (with m5 thread inside)
- spring (better not more than m100 for assembly and fine tuning)
Other parts:
- M4 nuts - 10
- M4 sunk head screw, 30mm - 4
- M4 flat head screw, 40mm or more - 6
- Pieces of M4 screw without head, 10 mm (cylinder head retainer) - 2
- Piece of M3 screw without head, 28-30mm (tappet spring retainer) - 1
- M5 sunk head screw, 20mm or longer -1
Assembled hopup + alluminium channels.
Assembled lower gearbox.
Step 1
Take all parts, remove extra plastic traces, dril all holes to be exactly 3 and 4 mm, except holes for cylinder head retaining screws, and hole in left part of gearbox for tappet spring retaining screw.
Holes for m4 nuts intentionally left blind to ensure good printing without support. Drill them through.
Install piston guides into left and right side of gearbox. File them a bit - they must sit firmly in places, but be extractable without exeptional force.
Take left part of gearbox, install M4 nuts, cylinder head retainet and tappet spring retainer. Install cylinder, cylinder head, tappet, tappet spring, nozzle and assembled piston.
Step 2
Add hop-up and alluminium channels assembly.
Attach spring guide to rear side of gearbox by m5 screw.
Step 3
Install right part of gearbox and secure in with 4 m4 30mm screws. Make sure hop up is in the right plase and secured by 2 m4 screws.
Step 4
Install assembled lower gearbox. Make sure that sector gear teeth is not wisible (they must point down inside lower gearbox) and tappet tail interacts with sector gear properly.Secure front side of box with m4 screw.
Install 3 m4 screws, which will fix alluminium channels.
Step 5
Install back plate of upper gearbox. Make sure it holds lower box and spring points inwards piston. Secure back plate by 2 m4 screws and place nuts an all of the screws.
Test
Screws pointing out of gearbox may look not great - but it is the easiest way to test box. When you'll start assembling rear external parts of AEG, screws will be replaced to hidden ones.
Test gearbox by shooting, make sure sound is right and speed of bb is good (fedd bb manually for now for chrono purposes)
FAQ
FAQ will be updated sometimes ;)
-
Why "mk3"?
I've tried a lot of different AEG designs, so this may be called mk10 or mk20, but i like mk3 for now. Worked a lot on mk2 version before, but redesigned it into mk3 after huge changes in conceptions =) -
How much plastics this project will consume?
About 1 kg if you do all well. I've spent about 8 kg on different versions and failed prints. -
What instruments will be required?
I've designed alluminium channels to be easily made, so they not require machining. Only electrical instrument required is electric drill. You'll also need lot of files, sanding paper, handsaw, screwdrivers, pliers and lots of patience =) -
Materials and printer requirements
I use ABS for this project. Maybe other sturdy plastics will be ok too. If you print gearbox parts of other plastics and it works - let me know, i'll add this info here.
I've designed parts of project to fit 200*200 mm printer table. Maximum length of single detail is about 190mm, except for top rail, which is 230+mm, but may be placed at hotbed diagonally. - FPS
Well,no springs for me - again. I've got maybe 200 of spare springs, but know nominals ony for 3 of them =( So only small tests for now. I perform tests with 0.28 gramm bb and use calculator to estimate values with 0.20 bb.
Performance: about 1500 dry shots, about 1500 normal shots:
With m100 spring - 87 m/s (286 fps) with 0.28 bb. It would be 1.06 joules or 103 m/s (338 fps) with 0.20 bb.
Stress test: in progress, about 150 shots, mostly dry ones. Gearbox still do it's job and not falling apart 8)
With m140 spring - 125 m/s (412 fps) with 0.28bb. It would be 2.2 joules or 148m/s (487 fps) with 0.20 bb.
I'm going to update progress sometimes =)
Distance, accuracy
Tested shooting distance with m100 spring and 0.28 balls. Hopup works well, balls fly 50 meters and still able to hit target sometimes. Tested on sports shooting ground, so 50 meters is pretty accurately measured. Target was me, so I'm absolutely sure balls may hit target ;)
Accuracy poor for now, tested gun without frontset. About 1 of 20 balls may hit standing human at 50 meters. Totally assembled gun must perform better.
Ball feeding is perfect, about 600 shots without dry ones - until mags are empty.
Update 10/06/2019: I've replaced hop-up rubber (used violet prometheus) and get much better accuracy on assebled AEG. Please, be patient, when you choose and install hop-up rubber - it's crucial to ensure good performance for airsoft gun.
Update 21/06/2019 Replaced full-sized cylinder to one with cut out. Improved accuracy. Seems it's now close in accuracy to a stock AEG.
Tested AEG at local CQB arena and really like results - gun is easy to use, ergonomical and allows fast transition from right to left shoulder.
Update 27.08.2019
I've visited milsim event "Burning zone" this weekend. It lasted for 24 hours of non-stop action, so I've tried AEG ergonomics in lots of different circumstances. Vehicle operations, deep forest at night, covert operations and large-scale combat (about 200 of participants). AEG performed well and without any malfunctions. Maybe pistol grip needs a bit redesign, but it is a modular part and do not need too much editing. Anyway, not every airsoft player spends 6+ hours holding his AEG in hand.
Total shot count already more than 10000, at least 4000 in different in-game situations.
creator
Metrics
Views
1.8K
Downloads
62
Project Info
release date
Apr 18, 2024
artifact type
library category
fabrication method
fabrication tool
3D Printer
release country
United States
language
English
license
Creative Commons Attribution-NonCommercial 4.0 International
files
| File | Extension |
|---|---|
| Airsoft electric toy gun mk3 - 2916390.zip | zip |
versions
Version: 1.0.0 latest
Summary
Airsoft electric gun with custom 3d printed gearbox. Uses TM-compatible parts for gearbox v3 and m-series mags. Barrel length 455 mm. For extra toughness of construction used 10x20 mm alluminium channels. Full-auto only.
Gearbox tested with 148 m/s (487fps) output and works well.
Upd 10/06/2019: Added video of shooting:
https://www.youtube.com/watch?v=STos1IOZB0s
Added video of disassembly. AEG can be assembled in reverse order:
https://youtu.be/76tCkqQzGN8
WARNING
Project is long, plastic-consuming and require both good 3d-printing and airsoft technican skills. Use safety measures, as with any airsoft rifle. Wear protective glasses anytime while working with this project.
All parts must fit into small printer, maximum length of detail is 190mm, maximum height about 100mm (one tall detail, may be printed in parts). Top rail length is about 235mm, it may fit daigonally in 200x200 hotbed, or be cut into halves, like in perfect remix by wildshark: https://www.thingiverse.com/thing:3534980.
Project parts
Project is large and consists of many parts. This is first part of project, containing upper gearbox.
When you finish printing and assemblling all published parts, you'll have an working airsoft gun.
Lower Gearbox - https://www.thingiverse.com/thing:2916563
Hopup and channels - https://www.thingiverse.com/thing:2916686 (incomplete instructions, but usable, no blueprint for front channels)
Trigger and triggerguard - https://www.thingiverse.com/thing:3001469
Handle and magwell - https://www.thingiverse.com/thing:3103108
Rear parts of body - https://www.thingiverse.com/thing:2996664
Middle section of body - https://www.thingiverse.com/thing:3377428 (incomplete instructions, may be unreadable (or cyrillic) operation names in Solidworks files)
Frontset - https://www.thingiverse.com/thing:3387099 (incomplete instructions, may be unreadable (or cyrillic) operation names in Solidworks files)
Order of assembly
All files published, some instructions will follow. All necessary instructions on gearbox assembly published.
I'll recommend printing and assembling of gun in this order:
- Upper gearbox, lower gearbox, hop-up(sides), upper and lower channels - make an working gearbox, most difficult part of project. Make sure it works smoothly before continue. Until you assemble rear body, do not use high-power springs.
- Finish hop-up and cross parts. On this stage you may chrono your assembly for the first time. Lot of painful fine-tuning and filing.
- Print tigger, handle, magwell. Assemble, make sure mags feed and wires fit in place.
- Print rear parts of body. If your gearbox works fine, you may install tougher spring after this step. Rear parts of body make gearbox stronger.
- Make left and right channels. than print middle body and finish with frontset.
- Enjoy =)
Upper gearbox assembly
Requirements
Warning - before print, make sure your printer is calibrated good. Sides of gearbox must be exactly 179mm long. If you have to scale details to make them appropriate sized, scale all other details of this project too.
Parts:
Printed:
- Left and right sides of upper gearbox (layer 0.2, infill 40%), lay on flat side,no supports.
- Piston guides (gearbox_insert) (layer 0.2, infill 40%), lay on flat side,no supports, print 2 for left and right side.
- Back part (gearbox_insert) (layer 0.2, infill 40%), spring guide hole must point sideways,no supports.
TM-compatible:
- cylinder
- cylinder head
- ak-type nozzle
- v3 tappet plate
- piston
- piston head
- tappet spring
- spring guide (with m5 thread inside)
- spring (better not more than m100 for assembly and fine tuning)
Other parts:
- M4 nuts - 10
- M4 sunk head screw, 30mm - 4
- M4 flat head screw, 40mm or more - 6
- Pieces of M4 screw without head, 10 mm (cylinder head retainer) - 2
- Piece of M3 screw without head, 28-30mm (tappet spring retainer) - 1
- M5 sunk head screw, 20mm or longer -1
Assembled hopup + alluminium channels.
Assembled lower gearbox.
Step 1
Take all parts, remove extra plastic traces, dril all holes to be exactly 3 and 4 mm, except holes for cylinder head retaining screws, and hole in left part of gearbox for tappet spring retaining screw.
Holes for m4 nuts intentionally left blind to ensure good printing without support. Drill them through.
Install piston guides into left and right side of gearbox. File them a bit - they must sit firmly in places, but be extractable without exeptional force.
Take left part of gearbox, install M4 nuts, cylinder head retainet and tappet spring retainer. Install cylinder, cylinder head, tappet, tappet spring, nozzle and assembled piston.
Step 2
Add hop-up and alluminium channels assembly.
Attach spring guide to rear side of gearbox by m5 screw.
Step 3
Install right part of gearbox and secure in with 4 m4 30mm screws. Make sure hop up is in the right plase and secured by 2 m4 screws.
Step 4
Install assembled lower gearbox. Make sure that sector gear teeth is not wisible (they must point down inside lower gearbox) and tappet tail interacts with sector gear properly.Secure front side of box with m4 screw.
Install 3 m4 screws, which will fix alluminium channels.
Step 5
Install back plate of upper gearbox. Make sure it holds lower box and spring points inwards piston. Secure back plate by 2 m4 screws and place nuts an all of the screws.
Test
Screws pointing out of gearbox may look not great - but it is the easiest way to test box. When you'll start assembling rear external parts of AEG, screws will be replaced to hidden ones.
Test gearbox by shooting, make sure sound is right and speed of bb is good (fedd bb manually for now for chrono purposes)
FAQ
FAQ will be updated sometimes ;)
-
Why "mk3"?
I've tried a lot of different AEG designs, so this may be called mk10 or mk20, but i like mk3 for now. Worked a lot on mk2 version before, but redesigned it into mk3 after huge changes in conceptions =) -
How much plastics this project will consume?
About 1 kg if you do all well. I've spent about 8 kg on different versions and failed prints. -
What instruments will be required?
I've designed alluminium channels to be easily made, so they not require machining. Only electrical instrument required is electric drill. You'll also need lot of files, sanding paper, handsaw, screwdrivers, pliers and lots of patience =) -
Materials and printer requirements
I use ABS for this project. Maybe other sturdy plastics will be ok too. If you print gearbox parts of other plastics and it works - let me know, i'll add this info here.
I've designed parts of project to fit 200*200 mm printer table. Maximum length of single detail is about 190mm, except for top rail, which is 230+mm, but may be placed at hotbed diagonally. - FPS
Well,no springs for me - again. I've got maybe 200 of spare springs, but know nominals ony for 3 of them =( So only small tests for now. I perform tests with 0.28 gramm bb and use calculator to estimate values with 0.20 bb.
Performance: about 1500 dry shots, about 1500 normal shots:
With m100 spring - 87 m/s (286 fps) with 0.28 bb. It would be 1.06 joules or 103 m/s (338 fps) with 0.20 bb.
Stress test: in progress, about 150 shots, mostly dry ones. Gearbox still do it's job and not falling apart 8)
With m140 spring - 125 m/s (412 fps) with 0.28bb. It would be 2.2 joules or 148m/s (487 fps) with 0.20 bb.
I'm going to update progress sometimes =)
Distance, accuracy
Tested shooting distance with m100 spring and 0.28 balls. Hopup works well, balls fly 50 meters and still able to hit target sometimes. Tested on sports shooting ground, so 50 meters is pretty accurately measured. Target was me, so I'm absolutely sure balls may hit target ;)
Accuracy poor for now, tested gun without frontset. About 1 of 20 balls may hit standing human at 50 meters. Totally assembled gun must perform better.
Ball feeding is perfect, about 600 shots without dry ones - until mags are empty.
Update 10/06/2019: I've replaced hop-up rubber (used violet prometheus) and get much better accuracy on assebled AEG. Please, be patient, when you choose and install hop-up rubber - it's crucial to ensure good performance for airsoft gun.
Update 21/06/2019 Replaced full-sized cylinder to one with cut out. Improved accuracy. Seems it's now close in accuracy to a stock AEG.
Tested AEG at local CQB arena and really like results - gun is easy to use, ergonomical and allows fast transition from right to left shoulder.
Update 27.08.2019
I've visited milsim event "Burning zone" this weekend. It lasted for 24 hours of non-stop action, so I've tried AEG ergonomics in lots of different circumstances. Vehicle operations, deep forest at night, covert operations and large-scale combat (about 200 of participants). AEG performed well and without any malfunctions. Maybe pistol grip needs a bit redesign, but it is a modular part and do not need too much editing. Anyway, not every airsoft player spends 6+ hours holding his AEG in hand.
Total shot count already more than 10000, at least 4000 in different in-game situations.
The files shown on this site are only available to U.S. Persons, as defined at 22 C.F.R. 120.15. The files are also not available to persons outside the United States or to residents of and persons in the State of New Jersey, with the exception of Federal Firearms Licensees.


